mirror of
https://github.com/alibaba/lowcode-engine.git
synced 2026-06-16 20:32:30 +00:00
203 lines
7.9 KiB
Markdown
203 lines
7.9 KiB
Markdown
---
|
||
title: 接入编辑器
|
||
sidebar_position: 0
|
||
---
|
||
|
||
您有两种方式初始化低代码编辑器:
|
||
|
||
1. clone 低代码项目的官方 demo,直接启动项目。适合普通人。
|
||
2. 手工引入低代码 UMD 包,手工配置、打包和启动。适合 Webpack 配置工程师。
|
||
|
||
## 方法 1:通过官方命令行工具创建编辑器
|
||
|
||
1. 确保本地安装了 Node.js 和 npm,如果没有,[您可以通过 nvm 进行快捷的安装](https://github.com/nvm-sh/nvm)
|
||
2. 确保为 npm [设置了可以访问的 npm 源,保证安装过程无网络问题](https://npmmirror.com/)
|
||
3. 安装官方命令行工具
|
||
```bash
|
||
npm install -g @alilc/create-element@latest
|
||
```
|
||
4. 通过命令行工具创建
|
||
```bash
|
||
npm init @alilc/element editor-project-name
|
||
```
|
||
这时会看到一个选项列表
|
||
|
||
<img src="https://img.alicdn.com/imgextra/i3/O1CN01LAaw2R1veHDYUzGB1_!!6000000006197-2-tps-676-142.png" width="350"/>
|
||
|
||
选择`编辑器`,并填写对应的问题,即可完成创建。
|
||
|
||
> 注 @alilc/create-element 版本需 >= 1.0.4,若看不到`编辑器`选项,请重新执行步骤 3
|
||
5. 进入创建后的目录
|
||
```bash
|
||
cd editor-project-name
|
||
```
|
||
6. 安装依赖
|
||
```bash
|
||
npm install
|
||
```
|
||
7. 安装依赖成功后,启动项目 (注意观察上一步的输出,如有 error 等失败信息,请先进行排查)
|
||
```bash
|
||
npm start
|
||
```
|
||
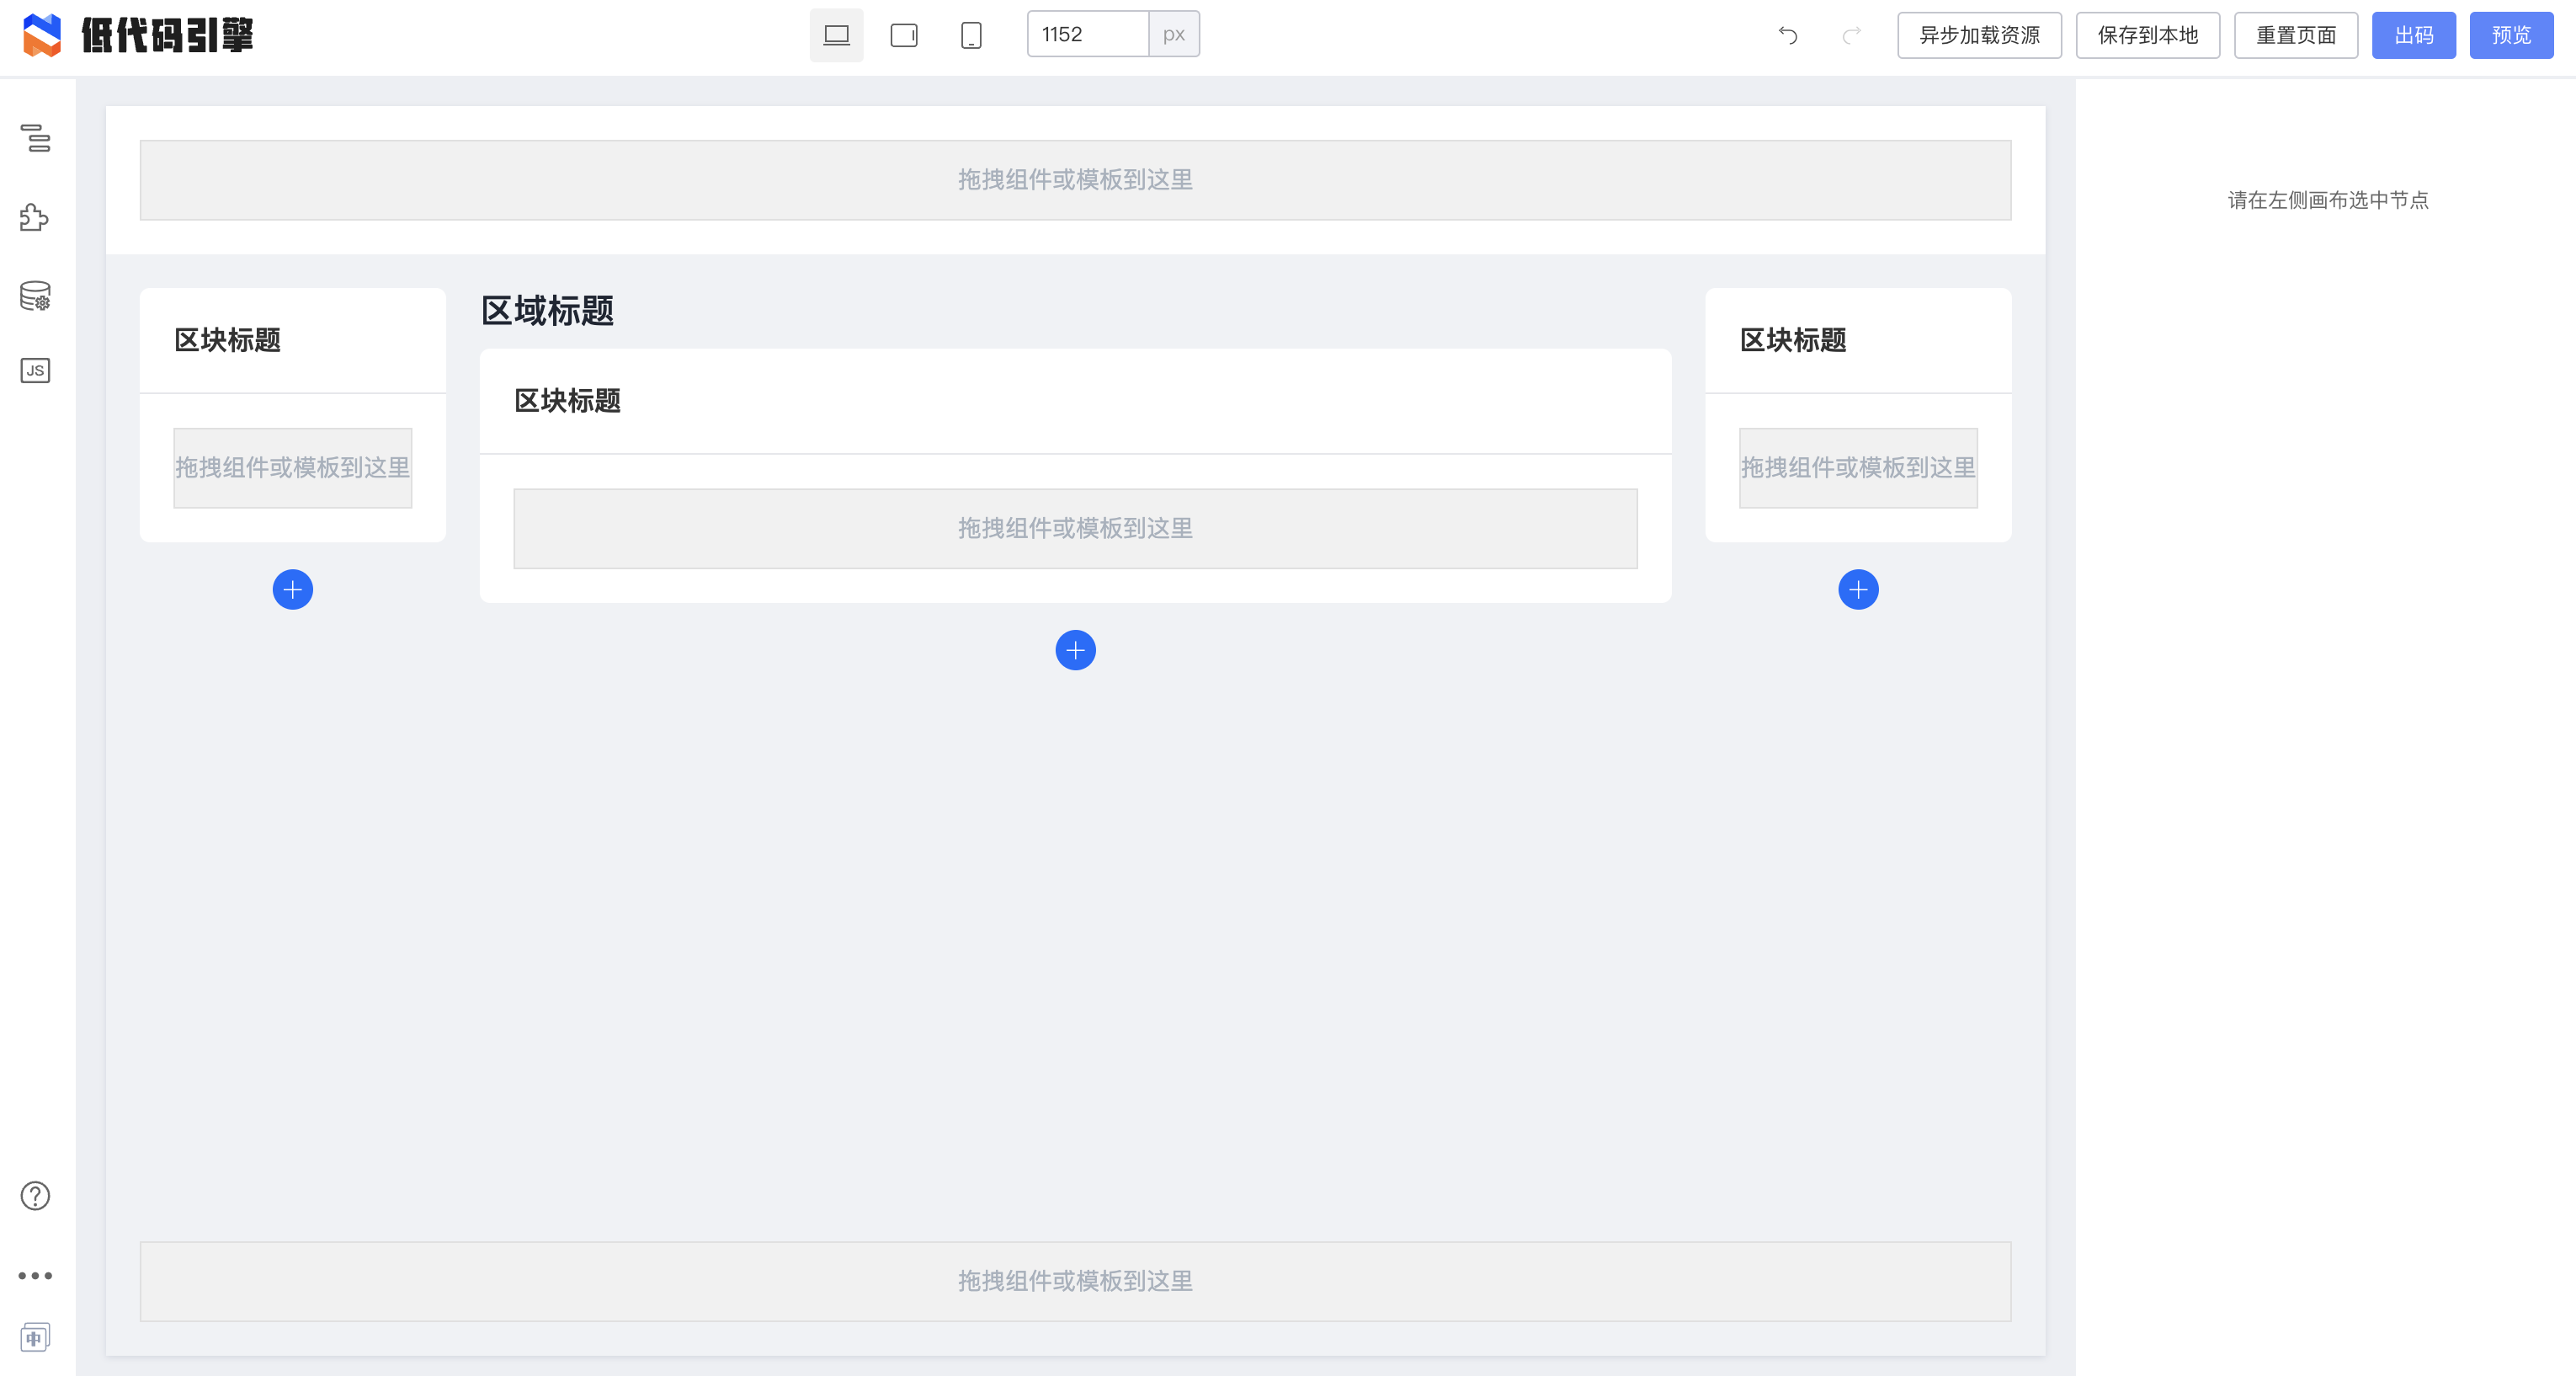
执行后如果看到这个界面,说明项目启动成功。您可以继续看后续章节了。本章节后续内容均为高级配置方式。
|
||
|
||
|
||
|
||
## 方法 2: 使用 UMD 包方式配置
|
||
|
||
如果您不是从零开始的项目,您可能需要手工引入低代码引擎。
|
||
|
||
### 引入 UMD 包资源
|
||
|
||
我们需要在启动前,正确在项目中通过 UMD 包方式直接依赖如下内容:
|
||
> 亦可使用异步加载工具,如果您按照正确的顺序进行加载
|
||
|
||
```html
|
||
<!-- 低代码引擎的页面框架样式 -->
|
||
<link rel="stylesheet" href="https://uipaas-assets.com/prod/npm/@alilc/lowcode-engine/1.0.18/dist/css/engine-core.css" />
|
||
<!-- Fusion Next 控件样式 -->
|
||
<link rel="stylesheet" href="https://g.alicdn.com/code/lib/alifd__next/1.23.24/next.min.css">
|
||
<!-- 低代码引擎的页面主题样式,可以替换为 theme-lowcode-dark -->
|
||
<link rel="stylesheet" href="https://alifd.alicdn.com/npm/@alifd/theme-lowcode-light/0.2.0/next.min.css">
|
||
<!-- 低代码引擎官方扩展的样式 -->
|
||
<link rel="stylesheet" href="https://uipaas-assets.com/prod/npm/@alilc/lowcode-engine-ext/1.0.5/dist/css/engine-ext.css" />
|
||
|
||
<!-- React,可替换为 production 包 -->
|
||
<script src="https://g.alicdn.com/code/lib/react/16.14.0/umd/react.development.js"></script>
|
||
<!-- React DOM,可替换为 production 包 -->
|
||
<script src="https://g.alicdn.com/code/lib/react-dom/16.14.0/umd/react-dom.development.js"></script>
|
||
<!-- React 向下兼容,预防物料层的依赖 -->
|
||
<script src="https://g.alicdn.com/code/lib/prop-types/15.7.2/prop-types.js"></script>
|
||
<script src="https://g.alicdn.com/platform/c/react15-polyfill/0.0.1/dist/index.js"></script>
|
||
<!-- lodash,低代码编辑器的依赖 -->
|
||
<script src="https://g.alicdn.com/platform/c/lodash/4.6.1/lodash.min.js"></script>
|
||
<!-- 日期处理包,Fusion Next 的依赖 -->
|
||
<script src="https://g.alicdn.com/code/lib/moment.js/2.29.1/moment-with-locales.min.js"></script>
|
||
<!-- Fusion Next 的主包,低代码编辑器的依赖 -->
|
||
<script src="https://g.alicdn.com/code/lib/alifd__next/1.23.24/next.min.js"></script>
|
||
<!-- 低代码引擎的主包 -->
|
||
<script crossorigin="anonymous" src="https://uipaas-assets.com/prod/npm/@alilc/lowcode-engine/1.0.18/dist/js/engine-core.js"></script>
|
||
<!-- 低代码引擎官方扩展的主包 -->
|
||
<script crossorigin="anonymous" src="https://uipaas-assets.com/prod/npm/@alilc/lowcode-engine-ext/1.0.5/dist/js/engine-ext.js"></script>
|
||
```
|
||
> 注:如果 unpkg 的服务比较缓慢,您可以使用官方 CDN 来获得确定版本的低代码引擎,如对于引擎的 1.0.18 版本,可用以下官方 CDN 替代
|
||
> - [https://uipaas-assets.com/prod/npm/@alilc/lowcode-engine/1.0.18/dist/js/engine-core.js](https://uipaas-assets.com/prod/npm/@alilc/lowcode-engine/1.0.18/dist/js/engine-core.js)
|
||
|
||
|
||
### 配置打包
|
||
|
||
因为这些资源已经通过 UMD 方式引入,所以在 webpack 等构建工具中需要配置它们为 external,不再重复打包:
|
||
|
||
```javascript
|
||
{
|
||
"externals": {
|
||
"react": "var window.React",
|
||
"react-dom": "var window.ReactDOM",
|
||
"prop-types": "var window.PropTypes",
|
||
"@alifd/next": "var window.Next",
|
||
"@alilc/lowcode-engine": "var window.AliLowCodeEngine",
|
||
"@alilc/lowcode-engine-ext": "var window.AliLowCodeEngineExt",
|
||
"moment": "var window.moment",
|
||
"lodash": "var window._"
|
||
}
|
||
}
|
||
```
|
||
|
||
### 初始化低代码编辑器
|
||
|
||
#### 方法 2.1 使用 init 进行初始化
|
||
|
||
正确引入后,我们可以直接通过 window 上的变量进行引用,如 `window.AliLowCodeEngine.init`。您可以直接通过此方式初始化低代码引擎:
|
||
|
||
```javascript
|
||
// 确保在执行此命令前,在 <body> 中已有一个 id 为 lce-container 的 <div />
|
||
window.AliLowCodeEngine.init(document.getElementById('lce-container'), {
|
||
enableCondition: true,
|
||
enableCanvasLock: true,
|
||
});
|
||
```
|
||
|
||
如果您的项目中使用了 TypeScript,您可以通过如下 devDependencies 引入相关包,并获得对应的类型推断。
|
||
```javascript
|
||
// package.json
|
||
{
|
||
"devDependencies": {
|
||
"@alilc/lowcode-engine": "^1.0.0"
|
||
}
|
||
}
|
||
```
|
||
```javascript
|
||
// src/index.tsx
|
||
import { init } from '@alilc/lowcode-engine';
|
||
|
||
init(document.getElementById('lce-container'), {
|
||
enableCondition: true,
|
||
enableCanvasLock: true,
|
||
});
|
||
```
|
||
|
||
init 的功能包括但不限于:
|
||
|
||
1. 传递 options 并设置 config 对象;
|
||
2. 传递 preference 并设置 plugins 入参;
|
||
3. 初始化 Workbench;
|
||
|
||
> 本节中的低代码编辑器例子可以在 demo 中找到:[https://github.com/alibaba/lowcode-demo/blob/main/demo-general/src/index.ts](https://github.com/alibaba/lowcode-demo/blob/main/demo-general/src/index.ts)
|
||
|
||
|
||
#### 方法 2.2 使用 skeletonCabin.Workbench 方式初始化
|
||
|
||
`init()` 内部会调用 `ReactDOM.render()` 函数,因此这样初始化的内容没有办法与外部的 React 组件进行通信,也就没有办法在一些自定义的 plugin 中获取 redux 上的全局数据等内容。
|
||
|
||
因此,这种场景下您可以通过 `skeletonCabin.Workbench` 进行初始化。
|
||
|
||
> 注:**不需要**同时使用 2.1 和 2.2 的方法。根据使用场景,当且只当有需要插件和外界进行一定通信时,才需要使用 2.2 提供的方法。
|
||
|
||
|
||
```javascript
|
||
import React, { useState, useEffect } from 'react';
|
||
import { project, plugins, common, skeleton } from '@alilc/lowcode-engine';
|
||
|
||
// 此处略去若干依赖引用
|
||
|
||
async function registerPlugins() {
|
||
// 此处略去若干插件注册
|
||
}
|
||
function EditorView() {
|
||
/** 插件是否已初始化成功,因为必须要等插件初始化后才能渲染 Workbench */
|
||
const [hasPluginInited, setHasPluginInited] = useState(false);
|
||
|
||
useEffect(() => {
|
||
plugins.init().then(() => {
|
||
setHasPluginInited(true);
|
||
}).catch(err => console.error(err));
|
||
}, []);
|
||
|
||
if (!hasPluginInited) {
|
||
return null;
|
||
}
|
||
const Workbench = common.skeletonCabin.Workbench;
|
||
return <Workbench />;
|
||
}
|
||
|
||
(async function main() {
|
||
await registerPlugins();
|
||
config.setConfig({
|
||
enableCondition: true,
|
||
enableCanvasLock: true,
|
||
supportVariableGlobally: true,
|
||
requestHandlersMap: {
|
||
fetch: createFetchHandler()
|
||
}
|
||
});
|
||
|
||
ReactDOM.render(<EditorView />, document.getElementById('lce-container')!);
|
||
})();
|
||
```
|
||
|
||
> 本节中的低代码编辑器类似的例子可以在 demo 中找到:[https://github.com/alibaba/lowcode-demo/blob/main/demo-custom-initialization/src/index.tsx](https://github.com/alibaba/lowcode-demo/blob/main/demo-custom-initialization/src/index.tsx)
|
||
|
||
|
||
## 配置低代码编辑器
|
||
详见[低代码扩展简述](/site/docs/guide/expand/editor/summary)章节。
|